This article is aimed at those who are new to the world of cruising sailing, but we are not going to explain the basic theory of sailing here. There is already a lot of literature about it in any beginner dinghy sailing course. We assume that the reader knows what the courses are (the compass rose) and the basic concepts of a sailing boat (dafting, landing, tacking, etc.).
In the first posts we are going to make a detailed description of the management of a sailing cruise. We write about rigged sails on cruises and how to properly deploy and trim them while sailing. We have added everything we consider important to know and take into account for efficient and safe navigation.
In this first post we are going to start by looking at how to raise the sails of the cruise ship.
Sails and main ropes
The following figure represents the basic elements of any candle:
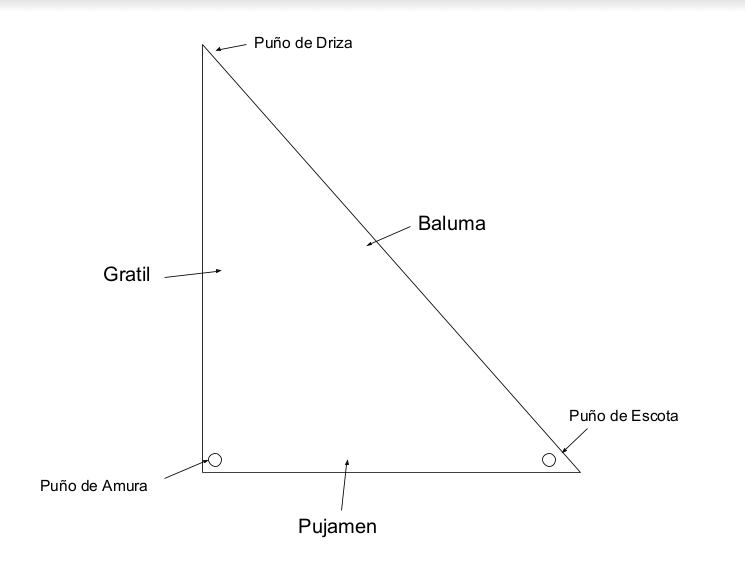
The luff is the forward-most part of the sail while the leech is the aft-most part of the sail.
To trim (adjust) the sail you will have to catch (tension) or tighten (loosen) the ropes that are firm at the cuffs (or ends). A halyard is a rope used to hoist a sail. The sheets are the ropes that are made firm to the clews and serve to orient the sails with respect to the wind. The outhaul is a rope with one end hooked to the clew and used to adjust the thrust horizontally, parallel to the boom (in the case of a mainsail). There are other ropes related to candles such as the amantillo or the cuningam that we will see later.
Initial considerations before unfurling the sails
When leaving the port mouth, the skipper, having a clear destination (anchorage or port) and therefore the course, will have to think about the maneuver of the sail. If we are unfortunate enough that there is not enough wind, we will have to do without the sail and make the trip by motor, with the consequent noise, pollution and fuel consumption. The concept of sufficient wind will depend on the boat, but as a general rule on a typical 40-foot charter cruiser we can consider that from 10 knots[1] It is worth setting sail. If it blows less, we will barely sail unless we are in a lighter boat or on a cruise-racer. The ideal wind for recreational sailing is therefore between 10 and 25 knots (force 3-5). More than 25 knots (force >=6) is dangerous and it is better not to go sailing.
In any case, even when we are going to sail by motor it is advisable to deploy the main because it gives stability to the boat and depending on the course it can even contribute to the movement. In conclusion, the mainsail is always hoisted, unless the planned journey is so short that it is not worth the possible effort.
The mainsail: Control elements
Rig Description
On modern cruise ships we can find two types of mainsail rigs, the traditional one and the furling one.
The traditional sail has battens, which are rigid pieces that cross the sail horizontally at different heights of the cloth, giving it shape. The sabers are forced (“full baton”) if they reach the post, or simple, if they do not reach the post. The forced batten majors are more demanding in navigation. In the traditional rig, when the sail is not deployed, it rests folded on the boom.
On the other hand, there is the most modern “furling” type sail, which rests rolled up inside the mast. It is generally considered easier to handle, mainly because there is no need to curl, and it is very widespread among charter boats (rental), although it has disadvantages in navigation compared to the first[2].
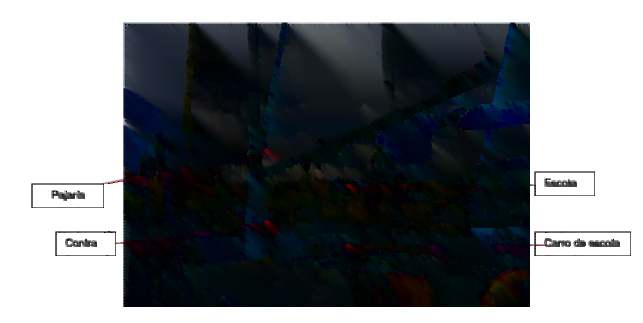
The first thing of all, something that we have to be clear about before setting sail, is to properly identify the mainsail rig, that is, what are the halyard, the sheet, the counter, the outhaul, the furler, etc. Figure 2 shows a schematic of a generic mainsail rig. I have already mentioned what a halyard, a sheet and the outhaul are. As a novelty in the drawing, the wing, the contra and the backstay appear.

What is Amantillo?
The halter is a rope used to hold the boom (or a pole in general). Its function is to keep the boom suspended horizontally when the main is not raised. The counter can be a rope with pulley rig or a rigid bar, and is used to give tension to the boom in a vertical downward direction. Finally, the backstay, not always present, is made up of a cable that goes from the top of the mast to the transom and its function is to provide rear tension to the mainmast.
The ropes described usually pass through the piano, which is a mechanism on deck through which most of the trim ropes pass and which has a braking system called a “stopper” for each of them. If the stopper is closed, the rope cannot be released, although more can be hunted. The mainsheet deserves special attention because it will go on a carriage and a set of blocks with various adjustments.
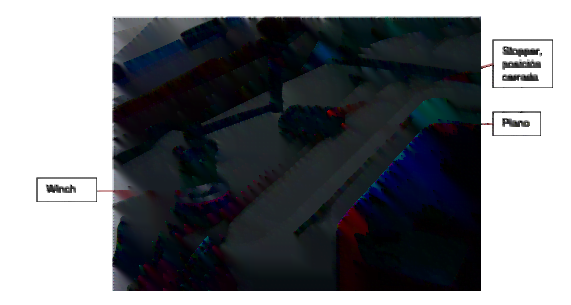
Winches, which are metal capstans installed on the deck and used to tension ropes, can be considered part of the boat's rigging.
Considerations prior to the maneuver
The sails are always deployed from stern to bow. Therefore, first the mainsail is deployed and then the genoa will be removed.[3]
From this point and throughout the rest of these notes, operations related to the handling of ropes on the ship are described. All the steps taken have the following security measure in common.
When you are going to work with a rope, before opening the stopper of your rig, it is very important to give it at least one turn through a winch and hold it firmly, since in some cases the rope may be under tension and it may escape. hands, either burning them or causing some other unwanted effect.
Equally basic and important is knowing how to use the winch. The ropes are wound around the winch in a clockwise direction.. (It doesn't work the other way). Whenever a rope is wound through the winch, it must be turned at least three times to be able to catch it or release it during navigation. This is not a convention but a necessity, since even with little wind the line can pull with quite a bit of force and to hunt or release a little it will be essential to apply maximum force on the line. In any case it is advisable to wear gloves. protection when working with ropes.
Another important comment is that you should not turn off the engine during the main lifting operation. It will be necessary to put a minimum forward gear. Firstly, this is necessary to be able to maneuver the boat by setting a course with the bow towards the wind. Second, in case a problem arises, it is a good idea to have the engine running.
Finally, raising the mainsail
The steps that must be taken into account are included, in the form of headings, in the order indicated:
1) Hunt the grasshopper
On some boats, the halyard line, which supports the boom, also acts as a halyard and, before setting sail, it will have to be released from the end of the boom to be punctured in the halyard head, leaving it hanging on the deck. during the time that the main remains lowered. In this case, the step in this section is not applicable since we can consider that now the halyard is the halyard and for all purposes it is as if we no longer had a halyard.
But in many boats, apart from the halyard, there is also a halyard, as is the case in all larger furling boats. Before hoisting the mainsail, it is advisable to trim the tack until the boom is firm in the vertical direction, thus releasing the tension on the sail, specifically on the leech. In this way the sail can be raised with less effort.
2) Check the situation of the rigging ropes
The lines related to the main, sheet, contra, outhaul and backstay must not be tightly wound, to facilitate hoisting the sail. But it is advisable to leave the sheet slightly drawn so that the boom does not go to the sides, causing the sail to begin to carry wind easily.
3) Bow course (“approach”)
The most important step is to place the bow facing exactly to windward to prevent the first folds of the mainsail that appear from putting pressure on the sail that makes it impossible to continue hoisting. Once, with the help of the engine, the skipper has set the exact course towards the wind, the lifting maneuver can begin. It is essential that the helmsman maintain a heading into the wind the entire time the sail is raised. Ultimately, the important thing is that the sail flutters while hoisted. If it is not possible to bring the boat completely forward and the sail catches wind, one option is to set a little mainsheet to cause the main to flutter.
Are you interested in: Upwind Sailing
4) Raise the sail
4a) Traditional system (with halyard)
At the skipper's command, a crew member will begin to pull the halyard. On boats with large sails, it is useful or necessary for another person to stand in front of the mast and help hoist by pulling the halyard down, using the weight of the body.
Once the main has risen almost to the top of the mast and the force exerted by the halyard is such that the sailors cannot continue pulling, it will be necessary to use the winch, winding the rope around it, with at least three turns, and continuing the lift until the top of the mast with the help of the handle. Remember that its gear has two directions of rotation and both contribute to the same rotation of the winch, tensioning the rope, although each direction has a different relationship of effort to degrees of rotation (like a clutch). If there is one, it is essential not to forget to close the stopper once we have finished using the halyard. It is also usually convenient to tie the line to a cleat (in case the stopper fails).
To have a rough idea of when we have to raise the main, one can look at the “wrinkle” that forms in the lower part of the sail, especially in the luff area. When the “wrinkle” appears we must stop lifting. Later when we take a course and the sail is carried, the wrinkle disappears.
4b) Main with furling
In this case the main is not hoisted but rather “unrolled”. (Actually the mainsail is already raised and furled inside the mast.) We additionally have a line that is the main furler. The outrigger plays a fundamental role in this type of rig. To deploy the mainsail you will have to leave the furler loose and free of all obstacles (- don't forget, for example, to open its stopper) and pull firmly on the outrigger that will progressively remove the sail.
The mainsails with furling also have a halyard that is used to raise and lower the sail and although it is not used during navigation, it is important to know its existence. It can be used to trim the mainsail or to lower it in case of emergency.
5) Grind mulch and hunt sheet
Once the main is deployed, it is this that must hold the boom and it is time to release the tack so that this is the case and the leech is tensioned in the process. The end result has to be that the mulch does not work. Finally, the most common thing is to trim some or all of the ends of the sail, being able to tension the sheet, counter and outrigger. The leech is a rope that some sails have at the end of the leech and that can be tensioned to secure it. The backstay is also an element to take into account once the mainsail is hoisted.
The extent to which all these capes are hunted depends above all on the course we are going to take. For the upwind, all the ropes will have to be fully hunted, but for a beam or length the sheet will be much more open, for example. All this is reviewed when talking about the courses and the trim of the sails.
Pick up the biggest
Before collecting the main gear, it is necessary to put the engine in gear, if it is not already in gear. We do not want to lose control of the boat once we have furled the last sail.
You have to approach, release the halyard and several people, at different heights of the boom, pick up the sail and fold it. You have to bring the sail back as it folds. On most boats it is usually useful to close the entrance hatch to the cabin, to increase the space under the boom but also to avoid falling out of the hatch if you take a wrong step. At the end, do not forget to tighten the tack and sheet so that the boom remains firm and still.
The genoa: Deploy and collect
Rig
There are different types of genoa depending on size. The genoa 1 is the largest and appropriate for light or moderate winds. If winds of force 4 or higher are expected, it is preferable to put a smaller genoa, such as a category 3 one.[6]
Normally we find the boat with the genoa installed and furled, but it is advisable to know the mechanism of its rig in case the sail has to be changed either in port or during navigation.
The bow stay will normally have a guide to “reline”[7] the genoa Furthermore, the mechanism for winding the sail around the stay is formed by two rotating drums. The furling line will pass around the lower drum, which rests on the deck forward. When the genoa is mounted on the rig, the halyard is attached to the upper rotating drum and this in turn is attached to the halyard head of the sail, so that when the halyard is taken, the drum and sail assembly rises. Thanks to this, when hunting or releasing the furling line, the drums and sail will rotate, but not the halyard.
PHOTO OF THE FULER AND IF POSSIBLE OF THE DRUM WITH THE HALYARD
It may be the case that a genoa is not furling, typically if it is a small sail, and then the furling mechanism is dispensed with. In this case, the genoa halyard is hooked directly on the halyard head and the sail is hoisted normally (reclined on the stay, as in the previous case). During the time that the sail is not hoisted, it will rest on the deck and it is advisable to keep it attached to it using some mechanism, with a rope or rubber band, etc.
Deploy the genoa
When the genoa is furled around the bow stay (which is in most cases), the maneuver consists of unfurling the sail by pulling the sheet on the leeward side. The steps to follow are those:
1) Adjust the sheet carriage
The car on the leeward side will be adjusted first. The car drives a pulley through which the sheet passes. It goes on a rail and there will be a mechanism to move it further forward or aft. Basically, for upwind courses, the car is placed further aft and for bearing courses the car is placed further forward. The carriage is discussed in detail later in relation to the trimming of the genoa.
PHOTO OF THE SCOTA CAR
2) Clear furler and opposite sheet
These ropes must be free so as not to impede the progress of the sail while it is unfurled. It will be necessary to remove the ropes, loosen the winch ropes, open stoppers and ensure that there is nothing that could hinder them.
*Important safety note:
It is important to flatten the furling line in a controlled manner, since in a strong gust it could run fast and cause an accident (“the genoa is a crazy horse”). To do this, what is done is to go around the rope using a cleat and a person hauls it while the sail comes out.
3) Take out the sail hunting the leeward sheet
The boat should not be facing forward but rather have at least a slight inclination with respect to the wind, so that the sail begins to lift as it goes out, which will help the maneuver (unlike what happened with the mainsail).
Before starting to pull the leeward sheet, it is made at least three turns around the winch. At the skipper's command, the leeward sheet is pulled while the furling line is flattened.
Once the sail is deployed, for the final adjustment, the sheet is bitten on the winch and the hunting effort is continued with the handle, until the sail is fully deployed and trimmed according to the course. Upwind, at maximum, in a more open beam, etc.
Pick up the genoa
Simply leave both sheets free of obstacles and hunt the furler. It should be done so that the sail is furled correctly, without folds or messes. To do this, it is advisable for the sail to carry a little wind, that is, not to approach completely, and it is helpful to keep the lee sheet somewhat taut while it is furled.
[1] One knot is equivalent to one nautical mile per hour and one nautical mile is equal to 1,852 km. As we see here, it is applied to indicate the speed of the wind although it is also used to refer to the speed of the ship. It makes no sense to translate from knots to km/h in navigation because distances at sea are measured in miles. For example, from Denia to Ibiza San Antonio there are about 60 nautical miles. If we sail at an average speed of 10 knots, it will take us about 6 hours to make the crossing.
[2] First, the furling system inside the mainmast has considerable weight and slows the boat down. Second, the mechanism is susceptible to breaking easily and if, for example, the furler gets stuck in a very windy situation, preventing us from retracting the sail, it can put us in very serious trouble. Finally, furling mainsails do not tension well, they create too much baggage and are therefore not very suitable for upwind sailing. Even so, it is very likely that the charter boat has this type of sail and you have to know it well.
[3] If we are lucky enough to travel on a classic boat with a mizzen mast and even a staysail, it will be the mizzen sail that is taken out first because it is further aft and the staysail will be taken out after the mainsail and before the (or ones) jib(s) !
[4] The mistake is frequently made of leaving a rope working with only one or two turns on the winch. It is essential to correct the error immediately by facing the boat to reduce the wind pressure on the sail in question and then furling the line with at least 3 turns.
[5] For example, Bavaria First 35 or even Club 20.
[6] Continuing with the order in descending size, a smaller sail is now considered a jib and finally, the smallest sail of all is assigned the name of storm jib.
[7] The pole is the thick front part of the sail, at the end of the luff. Reeling the sail is in this case passing the rope through the mast or the stay guide during the time it is hoisted.